Running the Synchronized Test
In this exercise you will run the synchronized test script and examine the test
results.
1 Confirm that the lesson4 test window is active in WinRunner.
Click the title bar of the lesson4 test window.
2 Confirm that Verify mode is selected in the Standard toolbar.
Verify mode will stay in effect until you choose a different mode.
3 Choose Run from Top.
Choose Run > Run from Top or click the Run from Top button. The Run Test
dialog box opens. Accept the default name "res2." Make sure that the Display
test results at end of run check box is selected.
4 Run the test.
Click OK in the Run Test dialog box. WinRunner starts running the test from the
first line in the script.
Watch how WinRunner waits for the "Insert Done" message to appear in the
status bar.
5 Review the results.
When the test run is completed, the test results appear in the WinRunner Test
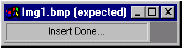
Results window. Note that a "wait for bitmap" event appears in green in the test
log section. This indicates that synchronization was performed successfully. You
can double-click this event to see a bitmap image of the status bar displaying the
"Insert Done" message.
When the test run is completed, the test results appear in the WinRunner Test
Results window. Note that a "wait for bitmap" event appears in green in the test
log section. This indicates that synchronization was performed successfully. You
can double-click this event to see a bitmap image of the status bar displaying the
"Insert Done" message.
6 Close the Test Results window.
Choose File > Exit.
7 Close the lesson4 test.
Choose File > Close in WinRunner.
8 Close the Flight Reservation application.
Choose File > Exit.
9 Change the timeout value back to 10000 milliseconds (10 seconds).
Choose Settings > General Options to open the General Options dialog box.
Click the Run tab. In the Timeout for Checkpoints and CS statements box,
change the current value to "10000". Click OK to close the dialog box.
To learn about additional synchronization methods, read the "Synchronizing the
Test Run" chapter in your WinRunner User’s Guide.
Choose File > Exit.
7 Close the lesson4 test.
Choose File > Close in WinRunner.
8 Close the Flight Reservation application.
Choose File > Exit.
9 Change the timeout value back to 10000 milliseconds (10 seconds).
Choose Settings > General Options to open the General Options dialog box.
Click the Run tab. In the Timeout for Checkpoints and CS statements box,
change the current value to "10000". Click OK to close the dialog box.
To learn about additional synchronization methods, read the "Synchronizing the
Test Run" chapter in your WinRunner User’s Guide.