• Before you create a script that reads text, determine where the text is located. If
the text is part of a standard GUI object, use a GUI checkpoint or TSL function
such as edit_get_text or button_get_info. If the text is part of a non-standard
GUI object, use the Create > Get Text > From Object/Window command. If the
text is part of a bitmap, use the Create > Get Text > From Screen Area
command.
• When WinRunner reads text from the application, the text appears in the script
as a comment (a comment is preceded by #). If the comment #no text was
found appears in the script, WinRunner does not recognize your application font.
Use the Font Expert to teach WinRunner this font.
• TSL includes additional functions that enable you to work with text such as
win_find_text, obj_find_text, and compare_text. For more information, refer
to the "Checking Text" chapter in your WinRunner User’s Guide.
Thursday, March 15, 2007
Running the Test on a New Version
Once the test script is debugged, you can run it on a new version of the Flight
Reservation application.
1 Open version 1B of the Flight Reservation application.
Choose Programs > WinRunner > Sample Applications > Flight 1B on the
Start menu. In the Login window, type your name and the password mercury,
and click OK. Reposition the Flight Reservation application and WinRunner so
that they are both clearly visible on your desktop.
2 In WinRunner, select Verify mode from the Run Mode list on the Standard
toolbar.
Verify mode will stay in effect until you select a different mode.
3 Choose Run from Top.
Choose Run > Run from Top, or click the Run from Top button. The Run Test
dialog box opens. Accept the default test run name "res1." Make sure that the
Display Test Results at End of Run check box is selected.
4 Run the test.
Click OK in the Run Test dialog box. The test run begins.
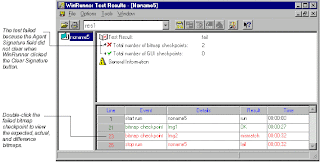
5 Review the test results.
The test fails because the graph was not updated after WinRunner placed an
order for one ticket. WinRunner read the total number of orders from the graph
and concluded that the text is incorrect.
6 Close the Test Results window.
Choose File > Exit.
7 Close the lesson9 test.
Choose File > Close.
8 Close version 1B of the Flight Reservation application.
Choose File > Exit.
Reservation application.
1 Open version 1B of the Flight Reservation application.
Choose Programs > WinRunner > Sample Applications > Flight 1B on the
Start menu. In the Login window, type your name and the password mercury,
and click OK. Reposition the Flight Reservation application and WinRunner so
that they are both clearly visible on your desktop.
2 In WinRunner, select Verify mode from the Run Mode list on the Standard
toolbar.
Verify mode will stay in effect until you select a different mode.
3 Choose Run from Top.
Choose Run > Run from Top, or click the Run from Top button. The Run Test
dialog box opens. Accept the default test run name "res1." Make sure that the
Display Test Results at End of Run check box is selected.
4 Run the test.
Click OK in the Run Test dialog box. The test run begins.
5 Review the test results.
The test fails because the graph was not updated after WinRunner placed an
order for one ticket. WinRunner read the total number of orders from the graph
and concluded that the text is incorrect.
6 Close the Test Results window.
Choose File > Exit.
7 Close the lesson9 test.
Choose File > Close.
8 Close version 1B of the Flight Reservation application.
Choose File > Exit.
Verifying Text
In this exercise you add an if/else statement to the test script in order to determine
whether the total was updated in the graph after you placed an order.
1 In the first obj_get_text statement in the lesson9 test script, change the
text variable to first_total.
2 In the second obj_get_text statement in the test script, change the text
variable to new_total.
3 Place the cursor below the last line of the script.
4 Add the following statements to the test script exactly as they appear
below.
if (new_total == first_total + 1)
tl_step ("graph total", 0, "Total is correct.");
else
tl_step ("graph total", 1, "Total is incorrect.");
In plain English, these statements mean "If new_total equals first_total plus 1,
report that the total is correct, otherwise (else) report that the total is incorrect."
5 Add a comment to describe what this section of the script will do.
Place the cursor above the if statement you added in the previous step. Choose
Edit > Comment. After the # sign, type: check that graph total increments by
one.
6 Save the test.
Choose File > Save or click the Save button.
Debugging the Test Script
You should now run the test in Debug mode in order to check for errors in syntax
and logic. If any error messages appear, look over the test script and try to fix the
problem.
1 Select Debug mode from the Run Mode list on the Standard toolbar.
Debug mode will stay in effect until you select a different mode.
2 Run the test.
Choose Run > Run from Top or click the Run from Top button. If you prefer to
run the test line by line, use the Step button.
3 Review the test results in the WinRunner Test Results window.
Choose Tools > Test Results or click the Test Results button. The WinRunner
Test Results window displays the results of the Debug test run.
If the tl_step event failed, a problem exists in the test script. Examine the script
and try to fix the problem.
4 Close the Test Results window.
Choose File > Exit in the WinRunner Test Results window.
5 Exit the Flight Reservation application.
Choose File > Exit.
Teaching Fonts to WinRunner
In the following exercise you will teach WinRunner the font used by the Flights
Reservation application.
Note that you only need to perform this exercise now if WinRunner did not
recognize text in the previous exercise. In general, you only need to teach fonts
to WinRunner if it does not automatically recognize the fonts in the application you
are testing.
To teach a font to WinRunner you:
• learn the set of characters (font) used by your application
• create a font group, a collection of fonts grouped together for specific testing
purposes
• activate the font group by adding the setvar TSL function to a test script
Learning Fonts
You use the WinRunner Fonts Expert to learn the fonts used by your application.
1 Start WinRunner and open a new test.
If WinRunner is not already open, choose Programs > WinRunner >
WinRunner on the Start menu. If the Welcome window is open, click the New
Test button. Otherwise, choose File > New. A new test window opens.
2 Open the Fonts Expert.
In WinRunner, choose Tools > Fonts Expert. The Font Expert window opens.
3 Open the Learn Font window.
In the Fonts Expert, choose Font > Learn. The Learn Fonts window opens.
4 Name the font in the Flight Reservation flights.
In the Font Name box, type flights.
5 Describe the properties of the flights font.
Click the Select Font button to open the Font dialog box. The Flight Reservation
font is MS Sans Serif, Bold, 8 points. Select these properties in the window and
click OK.
6 Learn the flights font.
In the Learn Font window, click the Learn Font button. When the learn process
is completed, the Existing Characters box displays the characters learned and
the Properties box displays the font’s properties.
7 Close the Learn Fonts window.
Click Close.
Creating a Font Group
After WinRunner learns a font, you must assign it to a font group. A font group can
contain one or more fonts. In this exercise you will create a font group which
contains only the flights font.
1 Open the Font Groups window.
In the Fonts Expert, choose Font > Groups.
2 Create a Font Group called flt_res and assign the flights font to it.
Type the name flt_res into the Group Name field. Select "flights" in the Fonts in
Library box. Click the New button.
3 Close the Font Groups window and the Fonts Expert.
Click Close.
4 Close the Fonts Expert.
Choose Font > Exit.
Activating a Font Group
The final step before you can read text is to activate the font group. You do this in
the General Options dialog box.
1 Open a blank test window in WinRunner.
If a blank test window is not currently open, choose File > New.
2 Activate the flt_res font group and the Image Text Recognition mechanism.
Choose Settings > General Options. In the General Options dialog box, click
the Text Recognition tab. Select the Use Image Text Recognition Mechanism
check box. In the Font Group box, type flt_res, and click OK.
Tuesday, March 13, 2007
Reading Text from an Application
In this exercise you will record the process of opening the graph in the Flight Reservation application to read the total number of tickets sold, creating a new order, and opening the graph again. In the next exercise you will add programming elements to the test script that verify the text in the graph.
Note that in order for WinRunner to read text on computers with certain display drivers, including ATI, you must learn the fonts in the Flight Reservation application before you can perform this exercise. If WinRunner fails to read text in the exercise below, stop the exercise, follow the instructions in "Teaching Fonts to WinRunner" in the next section, and then repeat this exercise from the beginning.
1 Start WinRunner and open a new test.
If WinRunner is not already open, choose Programs > WinRunner > WinRunner on the Start menu. If the Welcome window is open, click the New Test button. Otherwise, choose File > New. A new test window opens.
2 Open the Flight Reservation application and log in.
Choose Programs > WinRunner > Sample Applications > Flight 1A on the Start menu. In the Login window, type your name and the password mercury, and click OK. Reposition the Flight Reservation application and WinRunner so that they are both clearly visible on your desktop.
3 Start recording in Context Sensitive mode.
Choose Create > Record—Context Sensitive or click the Record button.
4 Open the graph.
In the Flight Reservation application, choose Analysis > Graphs.
5 Read the total from the graph.
In WinRunner, choose Create > Get Text > From Screen Area, or click the Get Text From Screen Area button on the User toolbar.
Use the crosshairs pointer and the left mouse button to drag a rectangle around the total. Click the right mouse button to finish the operation.

WinRunner inserts an obj_get_text statement into the test script. The text appears in the script as a comment.
6 Close the graph.
7 Create a new order.
Choose File > New Order in the Flight Reservation application.
7 Create a new order.
Choose File > New Order in the Flight Reservation application.
8 Enter flight and passenger information.

9 Insert the order into the database.
Click the Insert Order button. When the insertion is complete, the message "Insert Done" appears in the status bar:
Click the Insert Order button. When the insertion is complete, the message "Insert Done" appears in the status bar:

10 Synchronize the test so that it waits for the "Insert Done" message to appear in the status bar.
In WinRunner, choose the Create > Synchronization Point > For Object/Window Bitmap command or click the Synchronization Point For Object/Window Bitmap button on the User toolbar.
Use the pointer to click the "Insert Done" message.
11 Open the graph again.
Choose Analysis > Graphs.
12 Read the total from the graph.
Choose Create > Get Text > From Screen Area, or click the Get Text From Screen Area button on the User toolbar.
Use the crosshairs pointer and the left mouse button to drag a rectangle around the total.

Click the right mouse button to finish the operation. WinRunner inserts an obj_get_text statement into the test script.
13 Close the graph.
14 Stop recording.
Choose Create > Stop Recording or click the Stop button.
13 Close the graph.
14 Stop recording.
Choose Create > Stop Recording or click the Stop button.
15 Save the test.
Choose File > Save or click the Save button. Name the test lesson9 and click Save.
16 If you are working in the Global GUI Map File mode, save the new objects to the GUI map.
Choose Tools > GUI Map Editor. Choose View > GUI Files. Choose File > Save. Click Yes or OK to add the new object or new window to your GUI map.
Choose File > Exit to close the GUI Map Editor.

How Do You Read Text from an Application?
You can read text from any bitmap image or GUI object by adding text checkpoints to a test script. A text checkpoint reads the text from the application. You then add programming elements to the test script, which verify that the text is correct.
For example, you can use a text checkpoint to:
• verify a range of values
• calculate values
• perform certain operations only if specified text is read from the screen
To create a text checkpoint, you indicate the area, object, or window that contains the text you want to read.
WinRunner inserts a win_get_text or obj_get_text statement into the test script and assigns the text to a variable. To verify the text you add programming elements to the script.
Note that when you want to read text from a standard GUI object (such as an edit field, a list, or a menu), you should use a GUI checkpoint, which does not require programming. Use a text checkpoint only when you want to read text from a bitmap image or a non-standard GUI object.
In the following exercises you create a test that:
. opens a graph and reads the total number of tickets sold
. creates a new order for the purchase of one ticket
. opens the graph again and checks that the total number of tickets sold was updated
. reports whether the number is correct or incorrect
Reading Text
Reading Text
This lesson:
• describes how you can read text from bitmaps and non-standard GUI objects
• shows you how to teach WinRunner the fonts used by an application
• lets you create a test which reads and verifies text
• lets you run the test and analyze the results
This lesson:
• describes how you can read text from bitmaps and non-standard GUI objects
• shows you how to teach WinRunner the fonts used by an application
• lets you create a test which reads and verifies text
• lets you run the test and analyze the results
Monday, March 12, 2007
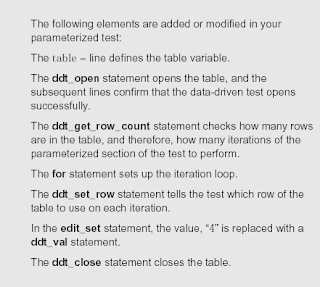
Data-Driven Testing Tips
• You can parameterize only part of your test script or a loop within it, and a single data-driven test can contain more than one parameterized loop.
• You can open and save data tables other than the default.xls data table. This enables you to use several different data tables in one test script.
• You can parameterize statements containing GUI checkpoints, bitmap checkpoints, and bitmap synchronization points, and constants.
• You can use the data table in the same way as an Excel spreadsheet, including inserting formulas into cells.
• Before you run a data-driven test, you should look through it to see if there are any elements that may cause a conflict in a data-driven test. There are two ways to solve most of these conflicts:
• Use a regular expression to enable WinRunner to recognize objects based on a portion of its physical description. For more information on regular expressions, refer to the "Using Regular Expressions" chapter in the WinRunner User’s Guide.
• Use the GUI Map Configuration dialog box to change the physical properties that WinRunner uses to recognize the problematic object.
• You can change the active row, or read from a non-active row during the test run by using TSL statements. For more information, refer to the "Using TSL Functions with Data-Driven Tests" chapter in the WinRunner User’s Guide.
• It is not necessary for the data table viewer to be open when you run a test.
Running the Test and Analyzing Results
You run the data-driven test just like any other test in WinRunner. When the test run is completed, the results for all iterations are included in a single Test Results window.
1 Make sure that the Flight 1A Flight Reservation application is open on your desktop.
2 In WinRunner, check that Verify mode is selected in the Standard toolbar.
3 Choose Run from Top.
Choose Run > Run from Top, or click the Run from Top button. The Run Test dialog box opens. Accept the default test run name, "res1". Make sure that the Display Test Results at End of Run check box is selected.
4 Run the test.
Click OK in the Run Test dialog box. The test will run through the parameterized section of the script five times, once for each row in the data table.
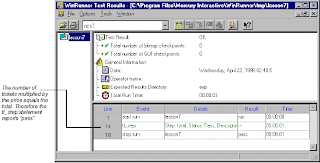
5 Review the results.
When the test run is completed, the test results appear in the WinRunner Test Results window.
When the test run is completed, the test results appear in the WinRunner Test Results window.

Note that the tl_step event is listed five times and that the details for each iteration include the actual number of tickets, price and total cost that was checked.
6 Close the test results.
Choose File > Exit to close the Test Results window.
7 Close the Flight Reservation application.
Choose File > Exit.
8 Close the lesson8 test.
Choose File > Close.
Choose File > Exit to close the Test Results window.
7 Close the Flight Reservation application.
Choose File > Exit.
8 Close the lesson8 test.
Choose File > Close.
Customizing the Results Information
You could run the test now, but it may be difficult for you to interpret the results for each iteration. You can add iteration-specific information to the reporting statements in your script so that you can see which data is the basis for each result.
1 Modify the tl_step statements.
Locate the first tl_step statement in your script. Delete the words "total is correct." and replace them with, "Correct. "tickets" tickets at $"price" cost $"total"."
tl_step("total",0, "Correct. "tickets" tickets at $"price" cost $"total".");
Use the same logic to modify the next tl_step statement to report an incorrect result. For example:
tl_step("total", 1, "Error! "tickets" tickets at $"price" does not equal $"total". ");
Now you will be able to see which data is used in each iteration when you view the results.
2 Save the test.
Choose File > Save or click the Save button.
Adjusting the Script with Regular Expressions
Your test is almost finished. Before running the test you should look through it to see if there are any elements that may cause a conflict in a data-driven test. The DataDriver wizard finds all fixed values in selected checkpoints and recorded statements, but it does not check for things such as object labels that also may vary based on external input.
In the flight application, the name of the Fax Order window changes to reflect the fax order number. If you run the test as it is, the test will fail on the second iteration, because the Flight Application will open a window labeled, "Fax Order No. 1", but the script tells it to make the window labeled, "Fax Order No. 4" active. WinRunner will be unable to find this window.
To solve this problem, you can use a regular expression. A regular expression is a string that specifies a complex search phrase in order to enable WinRunner to identify objects with varying names or titles.
In this exercise you will use a regular expression in the physical description of the Fax Order window so that WinRunner can ignore variations in the window’s label.
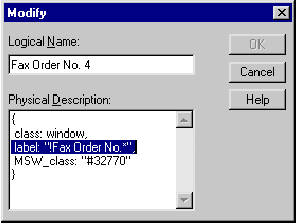
1 Locate the Fax Order window in the flight1a.gui GUI map file.
Choose Tools > GUI Map Editor. Choose View > GUI Files. Select the Fax Order No. 4 window icon.
2 Modify the window label with a regular expression.
Select Modify. The Modify window opens. In the Physical Description label line, add an "!" immediately following the opening quotes to indicate that this is a regular expression. Delete the period, space and the number "4" at the end of the line and replace this text with ".*" to indicate that the text following this phrase can vary.
3 Close the Modify dialog box.
Click OK to close the Modify window
4 Save the GUI map (only if you are working in the Global GUI Map File mode) and close the GUI Map Editor.
If you are working in the Global GUI Map File mode, Choose File > Save to save your changes and choose File > Exit to close the GUI Map Editor.
If you are working in the GUI Map File per Test mode, choose File > Exit to exit the GUI Map Editor.
Adding Data to the Data Table
Now that you have parameterized your test, you are ready to add the data that the
parameterized test will use.
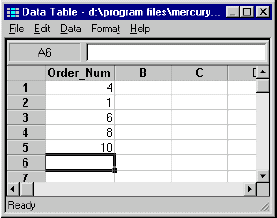
1 Open the data table.
Choose Tools > Data Table. The lesson8.xls table opens. Note that there is one
column named "Order_Num", and that the first row in the column contains the
value "4".
2 Add data to the table.
In rows 2, 3, 4, and 5 of the Order_Num column, enter the values, "1", "6", "8",
and "10" respectively.
parameterized test will use.
1 Open the data table.
Choose Tools > Data Table. The lesson8.xls table opens. Note that there is one
column named "Order_Num", and that the first row in the column contains the
value "4".
2 Add data to the table.
In rows 2, 3, 4, and 5 of the Order_Num column, enter the values, "1", "6", "8",
and "10" respectively.
3 Save and close the table.
Click an empty cell and choose File > Save from the data table menu. Then
choose File > Close to close the table.
4 Save the test.
Choose File > Save or click the Save button. Click Save to close the Save Test
dialog box.
Click an empty cell and choose File > Save from the data table menu. Then
choose File > Close to close the table.
4 Save the test.
Choose File > Save or click the Save button. Click Save to close the Save Test
dialog box.
Converting Your Test to a Data-Driven Test
Start by opening the test you created in Lesson 7 and using the DataDriver Wizard
to parameterize the test.
1 Create a new test from the lesson7 test.
If WinRunner is not already open, choose Programs > WinRunner >
WinRunner on the Start menu. If the Welcome window is open, click the Open
Test button. Otherwise, choose File > Open and select the test you created in
Lesson 7. The lesson7 test opens.
Choose File > Save As and save the test as lesson8 in a convenient location on
your hard drive.
2 Run the DataDriver Wizard.
Choose Tools > DataDriver Wizard. The DataDriver Wizard welcome window
opens. Click Next to begin the parameterization process.
3 Create a data table for the test.
In the Use a new or existing Excel table box, type "lesson8". The DataDriver
Wizard creates an Excel table with this name and saves it the test folder.
In the Use a new or existing Excel table box, type "lesson8". The DataDriver
Wizard creates an Excel table with this name and saves it the test folder.
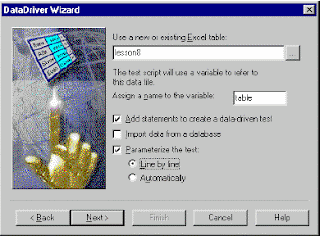
4 Assign a table variable name.
Accept the default table variable name, "table".
Accept the default table variable name, "table".
At the beginning of a data-driven test, the Excel data table you wish to use is
assigned as the value of the table variable. Throughout the script, only the table
variable name is used. This makes it easy for you to assign a different data table
to the script at a later time without making changes throughout the script.
5 Select global parameterization options.
Select Add statements to create a data-driven test. This adds TSL statements
to the test that define the table variable name, open and close the data table,
and run the appropriate script selection in a loop for each row in the data table.
Select Parameterize the test and choose the Line by line option. When you
select Parameterize the test, you instruct WinRunner to find fixed values in
recorded statements and selected checkpoints and to replace them with
parameters. The Line by line option instructs the wizard to open a screen for
each line of the selected test that can be parameterized so that you can choose
whether or not to parameterize that line.
Click Next.
6 Select the data to parameterize.
The first line-by-line screen opens. It refers to the Order Number radio button.

In this test you are going to open a different fax order in each iteration and the
Order Number radio button must be selected each time. Thus, for this script line,
keep the selection, Do not replace this data, and click Next.
The next line by line screen refers to the Order Number edit field. This is the field
you want to change for each iteration. Note that the value, "4" is highlighted and
listed in the Argument to be replaced box to indicate that this is the value
selected for parameterization.

Select A new column under "Replace the selected value with data from:" and
type: Order_Num in the adjacent edit field. The New Column option creates a
column titled "Order_Num" in the lesson8.xls table, and enters the value "4" in
the first row of the column.
type: Order_Num in the adjacent edit field. The New Column option creates a
column titled "Order_Num" in the lesson8.xls table, and enters the value "4" in
the first row of the column.
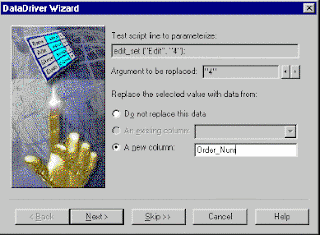
Click Next and then click Finish. Your test is parameterized.
How Do You Create Data-Driven Tests?
Once you have successfully debugged and run your test, you may want to see
how the same test performs with multiple sets of data. To do this, you convert
your test to a data-driven test and create a corresponding data table with the sets
of data you want to test.
Converting your test to a data-driven test involves the following steps:
• Adding statements to your script that open and close the data table.
• Adding statements and functions to your test so that it will read from the data
table and run in a loop while it applies each set of data.
• Replacing fixed values in recorded statements and checkpoint statements with
parameters, known as parameterizing the test.
You can convert your test to a data-driven test using the DataDriver Wizard or
you can modify your script manually.
When you run your data-driven test, WinRunner runs the parameterized part(s) of
the test one time (called an iteration) for each set of data in the data table, and
then displays the results for all of the iterations in a single Test Results window.
In Lesson 7 you created a test that opened a specific flight order and read the
number of tickets, price per ticket, and total price from a fax order dialog box in
order to check that the total price was correct. In this lesson you will create a test
that performs the same check on several flight orders in order to check that your
application computes the correct price for various quantities and prices of tickets.
Creating Data-Driven Tests
Creating Data-Driven Tests
This lesson:
• shows you how to use the DataDriver Wizard to create a data-driven test
• explains how to use regular expressions for GUI object names that vary with
each iteration of a test
• lets you run a test with several iterations and analyze the results
This lesson:
• shows you how to use the DataDriver Wizard to create a data-driven test
• explains how to use regular expressions for GUI object names that vary with
each iteration of a test
• lets you run a test with several iterations and analyze the results
Running the Test on a New Version
Once the test script is debugged, you can run it on a new version of the Flight
Reservation application.
1 Open version 1B of the Flight Reservation application.
Choose Programs > WinRunner > Sample Applications > Flight 1B on the
Start menu. In the Login window, type your name and the password mercury,
and click OK. Reposition the Flight Reservation application and WinRunner so
that they are both clearly visible on your desktop.
2 Select Verify mode from the Run Mode list on the Standard toolbar.
Verify mode will remain in effect until you select a different mode.
3 Choose Run from Top.
Choose Run > Run from Top, or click the Run from Top button. The Run Test
dialog box opens. Accept the default test run name "res1." Make sure that the
Display Test Results at End of Run check box is selected.
4 Run the test.
Click OK in the Run Test dialog box. The test run begins.
5 Review the test results.
When the test run is completed, the test results appear in the WinRunner Test Results window.
When the test run is completed, the test results appear in the WinRunner Test Results window.
You can double-click the tl_step statement in the test log to view the full details:
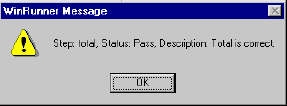
Notice that the message, "Total is correct", is the same message you wrote in the test script. Click OK to close the message.
6 Close the test results.
Choose File > Exit to close the Test Results window.
7 Close the lesson7 test.
Choose File > Close.
8 Close version 1B of the Flight Reservation application.
Choose File > Exit.
6 Close the test results.
Choose File > Exit to close the Test Results window.
7 Close the lesson7 test.
Choose File > Close.
8 Close version 1B of the Flight Reservation application.
Choose File > Exit.
Debugging the Test Script
After enhancing a test with programming elements, you should check that the test
runs smoothly, without errors in syntax and logic. WinRunner provides debugging
tools which make this process quick and easy.
You can:
• run the test line by line using the Step commands
• define breakpoints that enable you to stop running the test at a specified line or
function in the test script
• monitor the values of variables and expressions using the Watch List
When you debug a test script, you should run your test in Debug mode. (To run a
test in Debug mode, select Debug from the Run Mode list on the Standard
toolbar.) The test results are saved in a debug directory. Each time you run the
test in Debug mode, WinRunner overwrites the previous debug results.
In this exercise you will control the test run using the Step command. If any error
messages appear, examine the test script and try to fix the problem.
1 Select Debug mode from the Run Mode list on the Standard toolbar.
Debug mode will remain in effect until you select a different mode.
2 Place the execution marker –> next to the first line in the test script.
Click in the left margin, next to the first line in the test script.
3 Choose Run > Step or click the Step button to run the first line in the test script.
WinRunner runs the first line of the test.
4 Use the Step button to run the entire test, line by line.
Click the Step button to run each line of the test script. Note that your mouse pointer may sometimes move to the flight application as it clicks on objects during the test run.
5 Click Stop.
Click the Stop button to tell WinRunner that you have completed the Debug test run.
6 Review the test results in the WinRunner Test Results window.
When you run the test in Debug mode, the test results do not open automatically.
Choose Tools > Test Results or click the Test Results button. The WinRunner
Test Results window displays the results of the Debug test run.
7 Close the Test Results window.
Choose File > Exit.
8 Exit the Flight Reservation application.
Choose File > Exit.
Understanding tl_step
Understanding tl_step
In most cases when you run a test, WinRunner reports an overall test result of
pass or fail. By adding tl_step statements to your test script, you can determine
whether a particular operation within the test passed or failed, and send a
message to the report.
For example:
tl_step ("total", 1, "Total is incorrect.");
total is the name you assign to this operation.
1 causes WinRunner to report that the operation failed. If you use 0, WinRunner
reports that the operation passed.
Total is incorrect is the message sent to the report. You can write any message
that will make the test results meaningful.
Adding Logic to the Test Script
Adding Logic to the Test Script
In this exercise you will program decision-making logic into the test script using
an if/else statement. This enables the test to:
• check that the total is equal to the number of tickets ordered multiplied by the
price per ticket
• report whether the total is correct or incorrect
1 Place the cursor below the last edit_get_text statement in the lesson7
script.
2 Add the following statements to the test script exactly as they appear
below. Note that the tabs or spaces at the beginning of the second and
fourth lines are optional.
if (tickets*price == total)
tl_step ("total", 0, "Total is correct.");
else
tl_step ("total", 1, "Total is incorrect.");
In plain English these statements mean: "If tickets multiplied by price equals
total, report that the total is correct, otherwise (else) report that the total is
incorrect."

3 Add a comment to describe what this section of the script will do.
Place the cursor above the if statement you added in the previous step. Choose
Edit > Comment. After the # sign, type: check that the total ticket price is
calculated correctly.
4 Save the test.
Choose File > Save or click the Save button.
Place the cursor above the if statement you added in the previous step. Choose
Edit > Comment. After the # sign, type: check that the total ticket price is
calculated correctly.
4 Save the test.
Choose File > Save or click the Save button.
Using the Function Generator to Insert Functions
Using the Function Generator to Insert Functions
You are now ready to add functions to the test script which query the # Tickets,
Ticket Price, and Total fields in the Fax Order dialog box.
1 Insert a blank line above the button_press ("Cancel"); statement and place
the cursor at the beginning of this line.
2 Open the Fax Order dialog box.
Choose File > Fax Order in the Flight Reservation application.
3 Query the # Tickets field.
Choose Create > Insert Function > For Object/Window or click the
Insert Function for Object/Window button on the User toolbar. Use the
pointer to click the # Tickets field.
The Function Generator opens and suggests the edit_get_text function.
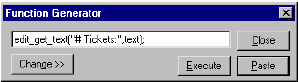
This function reads the text in the # Tickets field and assigns it to a variable. The
default variable name is text. Change the variable name, text, to tickets by typing
in the field:
default variable name is text. Change the variable name, text, to tickets by typing
in the field:
edit_get_text("# Tickets:",tickets);
Click Paste to add the function to the test script.
4 Query the Ticket Price field.
Choose Create > Insert Function > For Object/Window or click the
Insert Function for Object/Window button on the User toolbar. Use the
pointer to click the Ticket Price field.
The Function Generator opens and suggests the edit_get_text function.
Change the name of the text variable to price:
edit_get_text("Ticket Price:",price);
Click Paste to add the function to the test script.
5 Query the Total field.
Choose Create > Insert Function > For Object/Window or click the
Insert Function For Object/Window button on the User toolbar. Use the
pointer to click the Total field.
The Function Generator opens and suggests the edit_get_text function.
Change the name of the text variable to total:
edit_get_text("Total:",total);
Click Paste to add the function to the test script.
6 Close the Fax Order dialog box.
Click Cancel to close the dialog box in the Flight Reservation application.
7 Save the test.
Choose File > Save or click the Save button.
8 If you are working in the Global GUI Map File mode, save the new objects
to the GUI map.
Choose Tools > GUI Map Editor. Choose View > GUI Files. Choose File >
Save. Click Yes to add the new object or new window to your GUI map. A
WinRunner message box opens. Click OK. Choose File > Exit to close the GUI
Map Editor.
Recording a Basic Test Script
Recording a Basic Test Script
Start by recording the process of opening an order in the Flight Reservation
application and opening the Fax Order dialog box.
1 Start WinRunner and open a new test.
If WinRunner is not already open, choose Programs > WinRunner >
WinRunner on the Start menu. If the Welcome window is open, click the New
Test button. Otherwise, choose File > New. A new test window opens.
2 Start the Flight Reservation application and log in.
Choose Programs > WinRunner > Sample Applications > Flight 1A on the
Start menu. In the Login window, type your name and the password mercury,
and click OK. Reposition the Flight Reservation application and WinRunner so
that they are both clearly visible on your desktop.
3 Start recording in Context Sensitive mode.
Choose Create > Record—Context Sensitive or click the Record button on the
toolbar.
4 Open order #4.
In the Flight Reservation application, choose File > Open Order. In the
Open Order dialog box, select the Order No. check box and type "4" in the
adjacent box. Click OK to open the order.
5 Open the Fax Order dialog box.
Choose File > Fax Order.
6 Click Cancel to close the dialog box.
7 Stop recording.
Choose Create > Stop Recording or click the Stop button.
8 Save the test.
Choose File > Save or click the Save button. Save the test as lesson7 in a
convenient location on your hard drive. Click Save to close the Save Test dialog
box.
9 If you are working in the Global GUI Map File mode, save the new objects
to the GUI map.
Choose Tools > GUI Map Editor. Choose View > GUI Files. Choose File >
Save. Click Yes or OK to add the new object or new window to your GUI map.
Choose File > Exit to close the GUI Map Editor.
How Do You Program Tests with TSL?
How Do You Program Tests with TSL?
When you record a test, WinRunner generates TSL statements in a test script
each time you click a GUI object or type on the keyboard. In addition to the
recorded TSL functions, TSL includes many other built-in functions which can
increase the power and flexibility of your tests. You can quickly add these
functions to a test script using WinRunner’s visual programming tool, the Function
Generator. All functions located in the Function Generator are explained in the
TSL Online Reference and the TSL Reference Guide.
The Function Generator enables you to add TSL functions in two ways:
• You can point to a GUI object and let WinRunner "suggest" an appropriate
function. You can then insert this function into the test script.
• You can select a function from a list. Functions appear by category and
alphabetically.
You can further enhance your test scripts by adding logic. Simply type
programming elements such as conditional statements, loops, and arithmetic
operators directly into the test window.
Programming Tests with TSL
Programming Tests with TSL
This lesson:
• shows you how to use visual programming to add functions to your recorded test
scripts
• shows you how to add decision-making logic to a test script
• helps you debug a test script
• lets you run a test on a new version of an application and analyze the results
This lesson:
• shows you how to use visual programming to add functions to your recorded test
scripts
• shows you how to add decision-making logic to a test script
• helps you debug a test script
• lets you run a test on a new version of an application and analyze the results
Bitmap Checkpoint Tips
Bitmap Checkpoint Tips
• To capture an area, choose Create > Bitmap Checkpoint > For Screen Area or
click the Bitmap Checkpoint for Screen Area button on the User toolbar. (To
see this menu command, a test must be open. Otherwise it is inactive.) Use the
crosshairs pointer to mark the area that you want WinRunner to capture.
WinRunner inserts a win_check_bitmap statement into your test script. This
statement includes additional parameters that define the position (x- and ycoordinates)
and size (width and height) of the area.
• For overnight test runs, you can instruct WinRunner not to display a message
when a bitmap mismatch is detected. Choose Settings > General Options. In
the General Options dialog box, click the Run tab and clear the Break when
verification fails check box. This enables the test to run unattended.
when a bitmap mismatch is detected. Choose Settings > General Options. In
the General Options dialog box, click the Run tab and clear the Break when
verification fails check box. This enables the test to run unattended.

• When running a test that includes bitmap checkpoints, make sure that the screen
display settings are the same as when the test script was created. If the screen
settings are different, WinRunner will report a bitmap mismatch.
display settings are the same as when the test script was created. If the screen
settings are different, WinRunner will report a bitmap mismatch.
• If you want to create new expected results for a bitmap checkpoint, run the test
in Update mode. WinRunner overwrites the existing expected bitmaps with new
expected bitmaps captured during the Update run.
in Update mode. WinRunner overwrites the existing expected bitmaps with new
expected bitmaps captured during the Update run.
Running the Test on a New Version
Running the Test on a New Version
You can now run the test on a new version of the Flight Reservation application.
1 Close Flight Reservation 1A.
Choose File > Exit.
2 Start Flight Reservation 1B.
Choose Programs > WinRunner > Sample Applications > Flight 1B on the
Start menu. In the Login window, type your name and the password mercury,
and click OK. Reposition the Flight Reservation application and WinRunner so
that they are both clearly visible on your desktop.
3 Make sure that lesson6 is the active test.
Click in the lesson6 test window.
4 Check that Verify mode is selected in the Standard toolbar.
5 Choose Run from Top.
Choose Run > Run from Top, or click the Run from Top button. The Run Test
dialog box opens. Accept the default test run name "res1." Make sure that the
Display test results at end of run check box is selected.
6 Run the test.
Click OK. The test run begins.
If a mismatch is detected at a bitmap checkpoint, click Continue in the message
window.
7 Review the results.
When the test run is completed, the test results appear in the WinRunner Test Results window.
window.
7 Review the results.
When the test run is completed, the test results appear in the WinRunner Test Results window.
8 Close the Test Results window.
Choose File > Exit to close the Test Results window.
9 Close the lesson6 test.
Choose File > Close.
10 Close version 1B of the Flight Reservation application.
Choose File > Exit.
Choose File > Exit to close the Test Results window.
9 Close the lesson6 test.
Choose File > Close.
10 Close version 1B of the Flight Reservation application.
Choose File > Exit.
Viewing Expected Results
Viewing Expected Results
You can now view the expected results of the lesson6 test.
1 Open the WinRunner Test Results window.
Choose Tools > Test Results or click the Test Results button. The Test Results
window opens.
2 View the captured bitmaps.
In the test log section, double-click the first "capture bitmap" event, or select it
and click the Display button.
1 Open the WinRunner Test Results window.
Choose Tools > Test Results or click the Test Results button. The Test Results
window opens.
2 View the captured bitmaps.
In the test log section, double-click the first "capture bitmap" event, or select it
and click the Display button.

Next, double-click the second "capture bitmap" event, or select it and click the
Display button.
Display button.
3 Close the Test Results window.
Close the bitmaps and choose File > Exit to close the Test Results window.
Close the bitmaps and choose File > Exit to close the Test Results window.
Adding Bitmap Checkpoints to a Test Script
Adding Bitmap Checkpoints to a Test Script
In this exercise you will test the Agent Signature box in the Fax Order dialog box.
You will use a bitmap checkpoint to check that you can sign your name in the box.
Then you will use another bitmap checkpoint to check that the box clears when
you click the Clear Signature button.
1 Start WinRunner and open a new test.
If WinRunner is not already open, choose Programs > WinRunner >
WinRunner on the Start menu. If the Welcome window is open, click the New
Test button. Otherwise, choose File > New. A new test window opens.
2 Start the Flight Reservation application and log in.
Choose Programs > WinRunner > Sample Applications > Flight 1A on the
Start menu. In the Login window, type your name and the password mercury,
and click OK. Reposition the Flight Reservation application and WinRunner so
that they are both clearly visible on your desktop.
3 Start recording in Context Sensitive mode.
Choose Create > Record—Context Sensitive or click the Record button on the
toolbar.
4 Open order #6.
In the Flight Reservation application, choose File > Open Order. In the Open
Order dialog box, select the Order No. check box and type "6" in the adjacent
box. Click OK to open the order.
5 Open the Fax Order dialog box.
Choose File > Fax Order.
6 Enter a 10-digit fax number in the Fax Number box.
You do not need to type in parentheses or dashes.
7 Move the Fax Order dialog box.
Position the dialog box so that it least obscures the Flight Reservation window.
8 Switch to Analog mode.
Press F2 on your keyboard or click the Record button to switch to Analog mode.
9 Sign your name in the Agent Signature box.
10 Switch back to Context Sensitive mode.
Press F2 on your keyboard or click the Record button to switch back to Context
Sensitive mode.
11 Insert a bitmap checkpoint that checks your signature.
Choose Create > Bitmap Checkpoint > For Object/Window or click the
Bitmap Checkpoint for Object/Window button on the User toolbar.
Use the pointer to click the Agent Signature box. WinRunner captures the
bitmap and inserts an obj_check_bitmap statement into the test script.
12 Click the Clear Signature button.
The signature is cleared from the Agent Signature box.
13 Insert another bitmap checkpoint that checks the Agent Signature box.
Choose Create > Bitmap Checkpoint > For Object/Window or click the
Bitmap Checkpoint for Object/Window button on the User toolbar.
Use the pointer to click the Agent Signature box. WinRunner captures a
bitmap and inserts an obj_check_bitmap statement into the test script.
14 Click the Cancel button on the Fax Order dialog box.
15 Stop recording.
Choose Create > Stop Recording or click the Stop button.
16 Save the test.
Choose File > Save or click the Save button. Save the test as lesson6 in a
convenient location on your hard drive. Click Save to close the Save Test dialog
box.
17 If you are working in the Global GUI Map File mode, save the new objects
to the GUI map.
Choose Tools > GUI Map Editor. Choose View > GUI Files. Choose File >
Save. Click Yes or OK to add the new object or new window to your GUI map.
Choose File > Exit to close the GUI Map Editor.
How Do You Check a Bitmap?
How Do You Check a Bitmap?
If your application contains bitmap areas, such as drawings or graphs, you can
check these areas using a bitmap checkpoint. A bitmap checkpoint compares
captured bitmap images pixel by pixel.
To create a bitmap checkpoint, you indicate an area, window, or object that you
want to check. For example:

WinRunner captures a bitmap image and saves it as expected results. It then
inserts an obj_check_bitmap statement into the test script if it captures an
object, or a win_check_bitmap statement if it captures an area or window.
When you run the test on a new version of the application, WinRunner compares
the expected bitmap with the actual bitmap in the application. If any differences
are detected, you can view a picture of the differences from the Test Results
window.
Checking Bitmaps
Checking Bitmaps
This lesson:
• explains how to check bitmap images in your application
• shows you how to create a test that checks bitmaps
• shows you how to run the test in order to compare bitmaps in different versions
of an application
• helps you analyze the results
This lesson:
• explains how to check bitmap images in your application
• shows you how to create a test that checks bitmaps
• shows you how to run the test in order to compare bitmaps in different versions
of an application
• helps you analyze the results
GUI Checkpoint Tips
GUI Checkpoint Tips
• You can create a single GUI checkpoint in your test that checks several or all
objects in a window. Choose Create > GUI Checkpoint > For Multiple Objects.
The Create GUI Checkpoint dialog box opens, which enables you to add objects
to the GUI checkpoint and to specify the checks you want to perform on those
objects. When you finish creating the checkpoint, WinRunner inserts a
win_check_gui statement into the test script, which includes a checklist for the
selected objects.
• For overnight test runs, you can instruct WinRunner not to display a message
when a GUI mismatch is detected. Choose Settings > General Options. In the
General Options dialog box, click the Run tab, and clear the Break when
verification fails check box. This enables the test to run without interruption.
For more information on setting test run options, refer to the "Setting Global
Testing Options" and "Setting Testing Options from a Test Script" chapters in the
WinRunner User’s Guide.

• If you want to create new expected results for a GUI checkpoint, run the test in
Update mode. WinRunner overwrites the existing expected GUI data with new
data captured during the Update run.
Update mode. WinRunner overwrites the existing expected GUI data with new
data captured during the Update run.
Running the Test on a New Version
Running the Test on a New Version
In this exercise you will run the lesson5 test on a new version of the Flight
Reservation application in order to check the behavior of its GUI objects.
1 Open version 1B of the Flight Reservation application.
Choose Programs > WinRunner > Sample Applications > Flight 1B on the
Start menu. In the Login window, type your name and the password mercury,
and click OK. Position the Flight Reservation application and WinRunner so that
they are both clearly visible on your desktop.
2 Make sure that lesson5 is the active test.
Click in the lesson5 test window in WinRunner.
3 Check that Verify mode is selected in the toolbar.
4 Choose Run from Top.
Choose Run > Run from Top, or click the Run from Top button. The Run Test
dialog box opens. Accept the default test run name "res2." Make sure that the
Display Test Results at End of Run check box is selected.
5 Run the test.
Click OK. The test run begins. This process might take a while.
If a mismatch is detected at a GUI checkpoint, click Continue in the message
window.
6 Review the results.
When the test run is completed, the test results appear in the WinRunner Test
Results window. In the test log section, one "end GUI checkpoint" statement
appears in red and its Result field lists "mismatch." This indicates that one or
more of the checks performed on the object failed.
Double-click the red "end GUI checkpoint" event to view detailed results of the
failed check. The GUI Checkpoint Results dialog box opens. Select Customer
Name to display the dialog box as follows:

7 Close the Test Results window.
Click OK in the GUI Checkpoint Results dialog box and then choose File > Exit
to close the Test Results window.
8 Close the lesson5 test.
Choose File > Close.
9 Close version 1B of the Flight Reservation application.
Choose File > Exit.
Click OK in the GUI Checkpoint Results dialog box and then choose File > Exit
to close the Test Results window.
8 Close the lesson5 test.
Choose File > Close.
9 Close version 1B of the Flight Reservation application.
Choose File > Exit.
Running the Test
Running the Test
You will now run the lesson5 test in order to verify that the test runs smoothly.
1 Make sure that the Flight Reservation application is open on your desktop.
2 In WinRunner, check that Verify mode is selected in the Standard toolbar.
3 Choose Run from Top.
Choose Run > Run from Top, or click the Run from Top button. The Run Test
dialog box opens. Accept the default test run name "res1." Make sure that the
Display test results at end of run check box is selected.
4 Run the test.
Click OK in the Run Test dialog box.
5 Review the results.
When the test run is completed, the test results appear in the WinRunner Test
Results window. In the test log section all "end GUI checkpoint" events should
appear in green (indicating success).
Double-click an end GUI checkpoint event to view detailed results of that GUI
checkpoint. The GUI Checkpoint Results dialog box opens. Select Customer
Name to display the dialog box as follows:
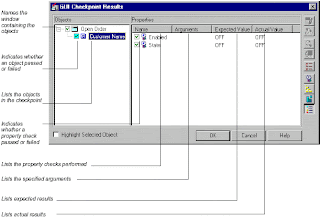
6 Close the test results.
Click OK to close the GUI Checkpoint Results dialog box. Then choose File >
Exit to close the Test Results window.
7 Close the Flight Reservation application.
Choose File > Exit.
Click OK to close the GUI Checkpoint Results dialog box. Then choose File >
Exit to close the Test Results window.
7 Close the Flight Reservation application.
Choose File > Exit.
Adding GUI Checkpoints to a Test Script
Adding GUI Checkpoints to a Test Script
In this exercise you will check that objects in the Flight Reservation Open Order
dialog box function properly when you open an existing order.
1 Start WinRunner and open a new test.
If WinRunner is not already open, choose Programs > WinRunner >
WinRunner on the Start menu. If the Welcome window is open, click the New
Test button. Otherwise, choose File > New. A new test window opens.
2 Start the Flight Reservation application and log in.
Choose Programs > WinRunner > Sample Applications > Flight 1A on the
Start menu. In the Login window, type your name and the password mercury,
and click OK. Reposition the Flight Reservation application and WinRunner so
that they are both clearly visible on your desktop.
3 Start recording in Context Sensitive mode.
Choose Create > Record—Context Sensitive or click the Record button on the
toolbar.
4 Open the Open Order dialog box.
Choose File > Open Order in the Flight Reservation application.
Choose File > Open Order in the Flight Reservation application.

5 Create a GUI checkpoint for the Order No. check box.
Choose Create > GUI Checkpoint > For Object/Window, or click the GUI
Checkpoint for Object/Window button on the User toolbar.
Choose Create > GUI Checkpoint > For Object/Window, or click the GUI
Checkpoint for Object/Window button on the User toolbar.
Use the pointer to double-click the Order No. check box. The Check GUI
dialog box opens and displays the available checks. Note that this dialog box
does not open if you only single-clicked the Order No. check box. Accept the
default check, "State." This check captures the current state (off) of the check
box and stores it as expected results.
Click OK in the Check GUI dialog box to insert the checkpoint into the test script.
The checkpoint appears as an obj_check_gui statement.
6 Enter "4" as the Order No.
Select the Order No. check box and type in 4 in the Order No. text box.
7 Create another GUI checkpoint for the Order No. check box.
Choose Create > GUI Checkpoint > For Object/Window or click the
GUI Checkpoint for Object/Window button on the User toolbar.
Use the pointer to single-click the Order No. check box. WinRunner
immediately inserts a checkpoint into the test script (an obj_check_gui
statement) that checks the default check "State." (Use this shortcut when you
want to use only the default check for an object.) This check captures the current
state (on) of the check box and stores it as expected results.
8 Create a GUI checkpoint for the Customer Name check box.
Choose Create > GUI Checkpoint > For Object/Window or click the
GUI Checkpoint for Object/Window button on the User toolbar.
Use the pointer to double-click the Customer Name check box. The Check
GUI dialog box opens and displays the available checks. Accept the default
check "State" and select "Enabled" as an additional check. The State check
captures the current state (off) of the check box; the Enabled check captures the
current condition (off) of the check box.
Click OK in the Check GUI dialog box to insert the checkpoint into the test script.
The checkpoint appears as an obj_check_gui statement.
9 Click OK in the Open Order dialog box to open the order.
10 Stop recording.
Choose Create > Stop Recording or click the Stop button.
11 Save the test.
Choose File > Save or click the Save button. Save the test as lesson5 in a
convenient location on your hard drive. Click Save to close the Save Test dialog
box.
12 If you are working in the Global GUI Map File mode, save the new objects
to the GUI map.
Choose Tools > GUI Map Editor. Choose View > GUI Files. Choose File >
Save. Click Yes or OK to add the new object or new window to your GUI map.
Choose File > Exit to close the GUI Map Editor.
Adding GUI Checkpoints to a Test Script
Adding GUI Checkpoints to a Test Script
In this exercise you will check that objects in the Flight Reservation Open Order
dialog box function properly when you open an existing order.
1 Start WinRunner and open a new test.
If WinRunner is not already open, choose Programs > WinRunner >
WinRunner on the Start menu. If the Welcome window is open, click the New
Test button. Otherwise, choose File > New. A new test window opens.
2 Start the Flight Reservation application and log in.
Choose Programs > WinRunner > Sample Applications > Flight 1A on the
Start menu. In the Login window, type your name and the password mercury,
and click OK. Reposition the Flight Reservation application and WinRunner so
that they are both clearly visible on your desktop.
3 Start recording in Context Sensitive mode.
Choose Create > Record—Context Sensitive or click the Record button on the
toolbar.
dialog box function properly when you open an existing order.
1 Start WinRunner and open a new test.
If WinRunner is not already open, choose Programs > WinRunner >
WinRunner on the Start menu. If the Welcome window is open, click the New
Test button. Otherwise, choose File > New. A new test window opens.
2 Start the Flight Reservation application and log in.
Choose Programs > WinRunner > Sample Applications > Flight 1A on the
Start menu. In the Login window, type your name and the password mercury,
and click OK. Reposition the Flight Reservation application and WinRunner so
that they are both clearly visible on your desktop.
3 Start recording in Context Sensitive mode.
Choose Create > Record—Context Sensitive or click the Record button on the
toolbar.
4 Open the Open Order dialog box.
Choose File > Open Order in the Flight Reservation application.
Choose File > Open Order in the Flight Reservation application.
5 Create a GUI checkpoint for the Order No. check box.
Choose Create > GUI Checkpoint > For Object/Window, or click the GUI
Checkpoint for Object/Window button on the User toolbar.
Choose Create > GUI Checkpoint > For Object/Window, or click the GUI
Checkpoint for Object/Window button on the User toolbar.
Use the pointer to double-click the Order No. check box. The Check GUI
dialog box opens and displays the available checks. Note that this dialog box
does not open if you only single-clicked the Order No. check box. Accept the
default check, "State." This check captures the current state (off) of the check
box and stores it as expected results.
Click OK in the Check GUI dialog box to insert the checkpoint into the test script.
The checkpoint appears as an obj_check_gui statement.
6 Enter "4" as the Order No.
Select the Order No. check box and type in 4 in the Order No. text box.
7 Create another GUI checkpoint for the Order No. check box.
Choose Create > GUI Checkpoint > For Object/Window or click the
GUI Checkpoint for Object/Window button on the User toolbar.
Use the pointer to single-click the Order No. check box. WinRunner
immediately inserts a checkpoint into the test script (an obj_check_gui
statement) that checks the default check "State." (Use this shortcut when you
want to use only the default check for an object.) This check captures the current
state (on) of the check box and stores it as expected results.
dialog box opens and displays the available checks. Note that this dialog box
does not open if you only single-clicked the Order No. check box. Accept the
default check, "State." This check captures the current state (off) of the check
box and stores it as expected results.
Click OK in the Check GUI dialog box to insert the checkpoint into the test script.
The checkpoint appears as an obj_check_gui statement.
6 Enter "4" as the Order No.
Select the Order No. check box and type in 4 in the Order No. text box.
7 Create another GUI checkpoint for the Order No. check box.
Choose Create > GUI Checkpoint > For Object/Window or click the
GUI Checkpoint for Object/Window button on the User toolbar.
Use the pointer to single-click the Order No. check box. WinRunner
immediately inserts a checkpoint into the test script (an obj_check_gui
statement) that checks the default check "State." (Use this shortcut when you
want to use only the default check for an object.) This check captures the current
state (on) of the check box and stores it as expected results.
8 Create a GUI checkpoint for the Customer Name check box.
Choose Create > GUI Checkpoint > For Object/Window or click the
GUI Checkpoint for Object/Window button on the User toolbar.
Use the pointer to double-click the Customer Name check box. The Check
GUI dialog box opens and displays the available checks. Accept the default
check "State" and select "Enabled" as an additional check. The State check
captures the current state (off) of the check box; the Enabled check captures the
current condition (off) of the check box.
Click OK in the Check GUI dialog box to insert the checkpoint into the test script.
The checkpoint appears as an obj_check_gui statement.
9 Click OK in the Open Order dialog box to open the order.
10 Stop recording.
Choose Create > Stop Recording or click the Stop button.
Choose Create > GUI Checkpoint > For Object/Window or click the
GUI Checkpoint for Object/Window button on the User toolbar.
Use the pointer to double-click the Customer Name check box. The Check
GUI dialog box opens and displays the available checks. Accept the default
check "State" and select "Enabled" as an additional check. The State check
captures the current state (off) of the check box; the Enabled check captures the
current condition (off) of the check box.
Click OK in the Check GUI dialog box to insert the checkpoint into the test script.
The checkpoint appears as an obj_check_gui statement.
9 Click OK in the Open Order dialog box to open the order.
10 Stop recording.
Choose Create > Stop Recording or click the Stop button.
11 Save the test.
Choose File > Save or click the Save button. Save the test as lesson5 in a
convenient location on your hard drive. Click Save to close the Save Test dialog
box.
12 If you are working in the Global GUI Map File mode, save the new objects
to the GUI map.
Choose Tools > GUI Map Editor. Choose View > GUI Files. Choose File >
Save. Click Yes or OK to add the new object or new window to your GUI map.
Choose File > Exit to close the GUI Map Editor.
Choose File > Save or click the Save button. Save the test as lesson5 in a
convenient location on your hard drive. Click Save to close the Save Test dialog
box.
12 If you are working in the Global GUI Map File mode, save the new objects
to the GUI map.
Choose Tools > GUI Map Editor. Choose View > GUI Files. Choose File >
Save. Click Yes or OK to add the new object or new window to your GUI map.
Choose File > Exit to close the GUI Map Editor.
How Do You Check GUI Objects?
How Do You Check GUI Objects?
When working with an application, you can determine whether it is functioning
properly according to the behavior of its GUI objects. If a GUI object does not
respond to input as expected, a defect probably exists somewhere in the
application’s code.
You check GUI objects by creating GUI checkpoints. A GUI checkpoint examines
the behavior of an object’s properties. For example, you can check:
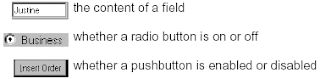 To create a GUI checkpoint for a single object, you first point to it in your
application. If you single-click the object, a checklist with the default checks for
the object you selected is inserted into your test script. A checklist contains
information about the GUI object and the selected properties to check. If you
double-click the object, the Check GUI dialog box opens and displays the object
you selected. Select the properties you want to check, and click OK to insert a
checklist for the object into your test script.

Whether you choose to check an object’s default properties or you specify the
properties of an object you want to check, WinRunner captures the current
values of those properties and saves this information as expected results. It then
inserts an obj_check_gui statement into the test script if you are checking an
object, or a win_check_gui statement if you are checking a window.
When you run this test on a new version of the application, WinRunner compares
the object’s expected behavior with its actual behavior in the application.
Checking GUI Objects
Checking GUI Objects
This lesson:
• explains how to check the behavior of GUI objects
• shows you how to create a test that checks GUI objects
• shows you how to run the test on different versions of an application and
examine the results
This lesson:
• explains how to check the behavior of GUI objects
• shows you how to create a test that checks GUI objects
• shows you how to run the test on different versions of an application and
examine the results
Running the Synchronized Test
Running the Synchronized Test
In this exercise you will run the synchronized test script and examine the test
results.
1 Confirm that the lesson4 test window is active in WinRunner.
Click the title bar of the lesson4 test window.
2 Confirm that Verify mode is selected in the Standard toolbar.
Verify mode will stay in effect until you choose a different mode.
3 Choose Run from Top.
Choose Run > Run from Top or click the Run from Top button. The Run Test
dialog box opens. Accept the default name "res2." Make sure that the Display
test results at end of run check box is selected.
4 Run the test.
Click OK in the Run Test dialog box. WinRunner starts running the test from the
first line in the script.
Watch how WinRunner waits for the "Insert Done" message to appear in the
status bar.
5 Review the results.
When the test run is completed, the test results appear in the WinRunner Test
Results window. Note that a "wait for bitmap" event appears in green in the test
log section. This indicates that synchronization was performed successfully. You
can double-click this event to see a bitmap image of the status bar displaying the
"Insert Done" message.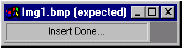
6 Close the Test Results window.
Choose File > Exit.
7 Close the lesson4 test.
Choose File > Close in WinRunner.
8 Close the Flight Reservation application.
Choose File > Exit.
9 Change the timeout value back to 10000 milliseconds (10 seconds).
Choose Settings > General Options to open the General Options dialog box.
Click the Run tab. In the Timeout for Checkpoints and CS statements box,
change the current value to "10000". Click OK to close the dialog box.
To learn about additional synchronization methods, read the "Synchronizing the
Test Run" chapter in your WinRunner User’s Guide.
Choose File > Exit.
7 Close the lesson4 test.
Choose File > Close in WinRunner.
8 Close the Flight Reservation application.
Choose File > Exit.
9 Change the timeout value back to 10000 milliseconds (10 seconds).
Choose Settings > General Options to open the General Options dialog box.
Click the Run tab. In the Timeout for Checkpoints and CS statements box,
change the current value to "10000". Click OK to close the dialog box.
To learn about additional synchronization methods, read the "Synchronizing the
Test Run" chapter in your WinRunner User’s Guide.
Thursday, March 8, 2007
Synchronizing the Test
Synchronizing the Test
In this exercise you will insert a synchronization point into the lesson4 test script. The synchronization point will capture a bitmap image of the "Insert Done" message in the status bar. Later on when you run the test, WinRunner will wait for the "Insert Done" message to appear before it attempts to click the Delete Order button.
1 Make sure that the lesson4 test window is active in WinRunner. Click the title bar of the lesson4 test window.
2 Place the cursor at the point where you want to synchronize the test. Add a blank line below the button_press ("Insert Order"); statement. Place the cursor at the beginning of the blank line.
3 Synchronize the test so that it waits for the "Insert Done" message to appear in the status bar. Choose Create > Synchronization Point > For Object/Window Bitmap or click the Synchronization Point for Object/Window Bitmap button on the User toolbar.
Use the pointer to click the message "Insert Done" in the Flight Reservation window. WinRunner automatically inserts an obj_wait_bitmap synchronization point into the test script. This statement instructs WinRunner to wait 1 second for the "Insert Done" message to appear in the status bar.
4 Manually change the 1 second wait in the script to a 10 second wait. The one-second wait that was inserted in the previous step isn’t long enough, so find the statement:
obj_wait_bitmap("Insert Done...", "Img1", 1);
and change the 1 at the end of the statement to a 10, to indicate a 10 second wait.
5 Save the test. Choose File > Save or click the Save button.
6 If you are working in the Global GUI Map File mode, save the new objects to the GUI map.
During this test you recorded an object in the Flight Reservation window (the Insert Done bitmap). You should save this object in your GUI map.
To save a new object from a window that already exists in your GUI map, choose
Tools > GUI Map Editor.
Choose View > GUI Files.
Note that the new object is displayed in the L0 GUI map file. Choose File > Save. The New Windows dialog prompts you to save the new window to the existing map file or to a new one. Click OK to add the new window to your GUI map.
Choose File > Exit to close the GUI Map Editor.
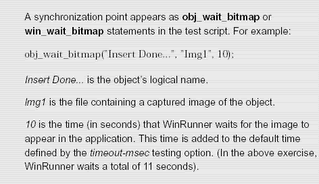
Identifying a Synchronization Problem
Identifying a Synchronization Problem
You are now ready to run the lesson4 test. As the test runs, look for a synchronization problem.
1 Make sure that the lesson4 test window is active in WinRunner. Click the title bar of the lesson4 test window.
2 Choose Run from Top. Choose Run > Run from Top or click the Run from Top button. The Run Test dialog box opens. Accept the default test run name "res1." Make sure that the Display test results at end of run check box is selected.
3 Run the test. Click OK in the Run Test dialog box. WinRunner starts running the test. Watch what happens when WinRunner attempts to click the Delete button.
4 Click Pause in the WinRunner message window. WinRunner fails to click the Delete Order button because the button is still disabled. This error occurred because WinRunner did not wait until the Insert Order operation was completed. Note that the execution arrow has paused opposite the command to click the Delete Order button.

Changing the Synchronization Setting
Changing the Synchronization Setting
The default interval that WinRunner waits for an application to respond to input is 10 seconds. In the next exercise you will identify a synchronization problem and add a synchronization point to solve it. To run the test you have just recorded with a synchronization problem, you need to change the default synchronization setting.
1 Open the General Options dialog box. Choose Settings > General Options.
2 Click the Run tab.
3 Change the value to 1000 milliseconds (1 second). In the Timeout for Checkpoints and CS statements box, change the value to "1000".
4 Click OK to close the dialog box.
Creating a Test
Creating a Test
In this first exercise you will create a test that opens a new order in the Flight Reservation application and inserts the order into a database.
1 Start WinRunner and open a new test. If WinRunner is not already open, choose Programs > WinRunner > WinRunner on the Start menu. If the Welcome window is open, click the New Test button. Otherwise, choose File > New. A new test window opens.
2 Start the Flight Reservation application and log in. Choose Programs > WinRunner > Sample Applications > Flight 1A on the Start menu. In the Login window, type your name and the password mercury, and click OK. Reposition the Flight Reservation application and WinRunner so that they are both clearly visible on your desktop.
3 Start recording in Context Sensitive mode. Choose Create > Record—Context Sensitive or click the Record button on the toolbar. WinRunner will start recording the test.
4 Create a new order. Choose File > New Order in the Flight Reservation application.
 6 Insert the order into the database. Click the Insert Order button. When the insertion is complete, the "Insert Done" message appears in the status bar.
7 Delete the order. Click the Delete Order button and click Yes in the message window to confirm the deletion.
8 Stop recording. Choose Create > Stop Recording or click the Stop button.
9 Save the test. Choose File > Save. Save the test as lesson4 in a convenient location on your hard drive. Click Save to close the Save Test dialog box.
When Should You Synchronize?
When Should You Synchronize?
When you run tests, your application may not always respond to input with the same speed. For example, it might take a few seconds:
• to retrieve information from a database
• for a window to pop up
• for a progress bar to reach 100%
• for a status message to appear
WinRunner waits a set time interval for an application to respond to input. The default wait interval is up to 10 seconds. If the application responds slowly during a test run, WinRunner’s default wait time may not be sufficient, and the test run may unexpectedly fail.
If you discover a synchronization problem between the test and your application, you can either:
• Increase the default time that WinRunner waits. To do so, you change the value of the Timeout for Checkpoints and CS Statements option in the Run tab of the General Options dialog box (Settings > General Options). This method affects all your tests and slows down many other Context Sensitive operations.
• Insert a synchronization point into the test script at the exact point where the problem occurs. A synchronization point tells WinRunner to pause the test run in order to wait for a specified response in the application. This is the recommended method for synchronizing a test with your application.
In the following exercises you will:
. create a test that opens a new order in the Flight Reservation application and inserts the order into the database
. change the synchronization settings
. identify a synchronization problem
. synchronize the test
. run the synchronized test
Synchronizing Tests
Synchronizing Tests
This lesson:
• describes when you should synchronize a test
• shows you how to synchronize a test
• shows you how to run the test and analyze the results
This lesson:
• describes when you should synchronize a test
• shows you how to synchronize a test
• shows you how to run the test and analyze the results
Recording Tips
Recording Tips
• Before starting to record, you should close applications that are not required for the test.
• Create the test so that it ends where it started. For example, if the test opens an application, make sure that it also closes the application at the end of the test run. This ensures that WinRunner is prepared to run repeated executions of the same test.
• When recording in Analog mode, avoid holding down the mouse button if this results in a repeated action. For example, do not hold down the mouse button to scroll a window. Instead, scroll by clicking the scrollbar arrow repeatedly. This enables WinRunner to accurately run the test.
• Before switching from Context Sensitive mode to Analog mode during a recording session, always move the current window to a new position on the desktop. This ensures that when you run the test, the mouse pointer will reach the correct areas of the window during the Analog portion of the test.
• When recording, if you click a non-standard GUI object, WinRunner generates a generic obj_mouse_click statement in the test script. For example, if you click a graph object, it records: obj_mouse_click (GS_Drawing, 8, 53, LEFT); If your application contains a non-standard GUI object that behaves like a standard GUI object, you can map this object to a standard object class so that WinRunner will record more intuitive statements in the test script. For more information refer to the "Configuring the GUI Map" chapter in your WinRunner User’s Guide.
• If you are working in the Global GUI Map File mode, then if you click an object whose description was not previously learned, WinRunner learns a description of the object and adds it to a temporary GUI map file. For more information, refer to the "Working in the Global GUI Map File Mode" chapter in your WinRunner User’s Guide.
• To easily switch between Context Sensitive and Analog modes, press F2.
• If you are working in Global GUI Map File mode, always check whether new windows or objects have been added to the temporary GUI map before you close WinRunner. If new objects have been added, save them to the appropriate GUI map file for your test.
Analyzing Test Results
Analyzing Test Results
Once a test run is completed, you can immediately review the test results in the WinRunner Test Results window. WinRunner color-codes results (green indicates passed and red indicates failed) so that you can quickly draw conclusions about the success or failure of the test.
1 Make sure that the WinRunner Test Results window is open and displays the test results.
If the WinRunner Test Results window is not currently open, first click the test window to activate it, and then choose Tools > Test Results or click the Test Results button.
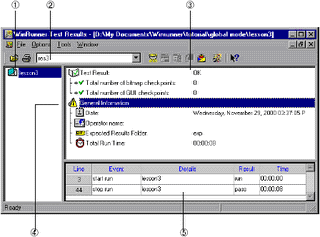 1 Displays the name of the current test.
 2 Shows the current results directory name.
3 Shows whether a test run passed or failed.
4 Includes general information about the test run such as date, operator name, and total run time. To view these details, double click the Information icon.
5 The test log section lists the major events that occurred during the test run. It also lists the test script line at which each event occurred.
2 Review the results.
3 Close the Test Results window. Choose File > Exit in the WinRunner Test Results window.
4 Close the test. Choose File > Close.
5 Close the Flight Reservation application. Choose File > Exit.
3 Close the Test Results window. Choose File > Exit in the WinRunner Test Results window.
4 Close the test. Choose File > Close.
5 Close the Flight Reservation application. Choose File > Exit.
Running the Test
Running the Test
You are now ready to run your recorded test script and to analyze the test results. WinRunner provides three modes for running tests. You select a mode from the toolbar.
• Use Verify mode when running a test to check the behavior of your application, and when you want to save the test results.
• Use Debug mode when you want to check that the test script runs smoothly without errors in syntax. See Lesson 7 for more information.
• Use Update mode when you want to create new expected results for a GUI checkpoint or bitmap checkpoint. See Lessons 5 and 6 for more information.
To run the test:
1 Check that WinRunner and the main window of the Flight Reservation application are open on your desktop.
2 Make sure that the lesson3 test window is active in WinRunner. Click the title bar of the lesson3 test window. If the test is not already open, choose File > Open and select the test.
3 Make sure the main window of the Flight Reservation application is active. If any dialog boxes are open, close them.
4 Make sure that Verify mode is selected in the toolbar.
5 Choose Run from Top. Choose Run > Run from Top or click the Run from Top button. The Run Test dialog box opens.

6 Choose a Test Run name. Define the name of the folder in which WinRunner will store the results of the test. Accept the default folder name "res1." The results folder will be stored within the test’s folder. Note the Display Test Results at end of run check box at the bottom of the dialog box. When this check box is selected, WinRunner automatically displays the test results when the test run is completed. Make sure that this check box is selected.
7 Run the test. Click OK in the Run Test dialog box. WinRunner immediately begins running the test. Watch how WinRunner opens each window in the Flight Reservation application.
8 Review the test results. When the test run is completed, the test results automatically appear in the WinRunner Test Results window. See the next section to learn how to analyze the test results.
Recording in Analog Mode
Recording in Analog Mode
In this exercise you will test the process of sending a fax. You will start recording in Context Sensitive mode, switch to Analog mode in order to add a signature to the fax, and then switch back to Context Sensitive mode.
In this exercise you will test the process of sending a fax. You will start recording in Context Sensitive mode, switch to Analog mode in order to add a signature to the fax, and then switch back to Context Sensitive mode.
1 In the lesson3 test, place the cursor below the last line of the script. You will add the new test segment to the lesson3 test. If the test is not already open, choose File > Open and select the test. In the lesson3 test window, place the cursor below the last line of the test.
2 Start Recording in Context Sensitive mode. Choose Create > Record—Context Sensitive or click the Record button on the toolbar.
edit_set ("Edit", "3");
For more information about the different ways in which WinRunner records keyboard input, choose Help > TSL Online Reference.
3 Open the Fax Order form and fill in a fax number. In the Flight Reservation application, choose File > Fax Order. In the Fax Number box, type "4155551234".
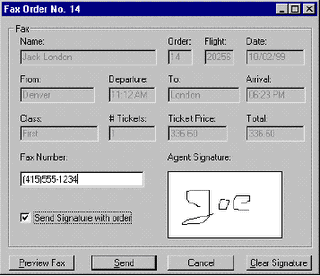
4 Select the Send Signature with Order check box.
5 Sign the fax in Context Sensitive mode. Use the mouse to sign your name in the Agent Signature box.
Watch how WinRunner records your signature.
6 Clear the signature. Click the Clear Signature button.
7 Move the Fax Order window to a different position on your desktop. Before switching to Analog mode, reposition the window in which you are working.
8 Sign the fax again in Analog mode. Press F2 on your keyboard or click the Record button again to switch to Analog mode. Sign your name in the Agent Signature box. Watch how WinRunner records your signature.
9 Switch back to Context Sensitive mode and send the fax. Press F2 or click the Record button to switch back to Context Sensitive mode. Click Send. The application will simulate the process of sending the fax.
10 Stop Recording. Choose Create > Stop Recording or click the Stop button.
11 Save the test. Choose File > Save or click the Save button.
12 If you are working in the Global GUI Map File mode, save the new objects to the GUI map. When you ran the RapidTest Script wizard in the previous lesson, it learned all the windows and objects it was able to access. The fax order dialog box, however, can be open only when an order has already been opened, as you did in step 5 of Recording a Context Sensitive Test on page 38. Therefore, when you opened the fax order dialog box in step 3 above, WinRunner added the new window, and the objects you recorded within that window, to the temporary GUI map. The temporary GUI map is discarded whenever you close WinRunner, so it is important to save new windows and objects to the GUI map file that your test uses.
Choose Tools > GUI Map Editor. Choose View > GUI Files. Note that the Fax Order No. 3 window is displayed in the L0 GUI map file. Choose File > Save. The New Windows dialog box opens. Confirm that the flight1a.GUI file is displayed in the Loaded GUI Files box. Click OK. The Fax Order No. 3 window and all objects under that window are moved from the temporary GUI map to the flight1a.GUI map file. Choose File > Exit to close the GUI Map Editor.
Subscribe to:
Posts (Atom)